aeraiva
Dedicated Civic Owner
DIY: 6th Gen LX/DX/CX/HX to EX Exhaust Conversion
Information gathered by myself and from other sources. Compiled into one, easy to follow DIY. Please note though that this write-up is for replacing your ENTIRE exhaust system, from manifold to tailpipe.
Items Needed:
Introduction
Looking to install a newer, stronger, aftermarket exhaust system on your 6th Gen LX/DX/CX/HX Civic and wanting to open up your engine bay a bit more? Perhaps upgrade your entire exhaust system to something with a little more breathing room? In this DIY, I'll explain how to convert your exhaust to the EX system and the parts you will need.
LX/DX/CX/HX Exhaust Layout:

The headers that are made for 6th generation Civics are only made for EX models. The EX is considered to have a "normal" manifold as the catalytic converter is located under the body of the car, not inside the bay near the block. You'll notice with your LX/DX/CX/HX model Civic, the catalytic converter is located visibly from the bay, just after the start of your manifold.
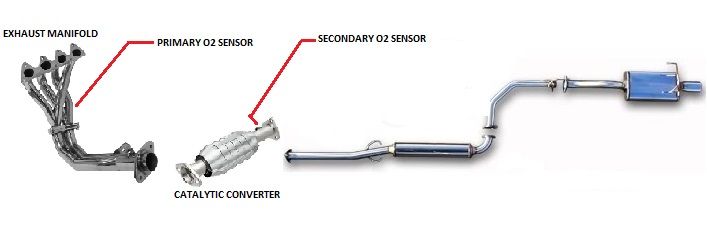
EX Exhaust Layout:
Step 1: Install the NEW EX header.
Step 2: Install your NEW catalytic converter directly to the end of your newly installed header. You may be able to reuse your spring loaded bolts from your previous install. If not, stop by either (a) your local hardware store and pick-up some new 3" long 14mm grade 8 bolts with 1.5" washers and matching nuts. Be sure to reapply the spring from your previous setup. You can bolt it straight on without if you like but the springs are there to ease the tension from your header as your car moves/vibrates. (b) Stop by or order replacement spring-loaded bolts from a Honda retailer. (c) Hit-up your local junk-yard or pick-n-pull.
Step 3: Install your O2 sensor wire extension harness. The new primary is located in about the same area as your previous setup but your new secondary will be further below your car onto the BACK of your new catalytic converter.
Step 4: Install your NEW EX exhaust system onto the back of your newly installed catalytic converter.
Step 5: Enjoy!
Additional Information
Information gathered by myself and from other sources. Compiled into one, easy to follow DIY. Please note though that this write-up is for replacing your ENTIRE exhaust system, from manifold to tailpipe.
Items Needed:
- EX header/exhaust manifold
- EX catalytic converter
- O2 sensor extension wire harness/kit
- EX aftermarket catback exhaust
- Additional gaskets (exhaust manifold & cat to exhaust - if not provided with your NEW equipment)
- Additional hardware (if not provided with your NEW equipment)
Introduction
Looking to install a newer, stronger, aftermarket exhaust system on your 6th Gen LX/DX/CX/HX Civic and wanting to open up your engine bay a bit more? Perhaps upgrade your entire exhaust system to something with a little more breathing room? In this DIY, I'll explain how to convert your exhaust to the EX system and the parts you will need.
LX/DX/CX/HX Exhaust Layout:
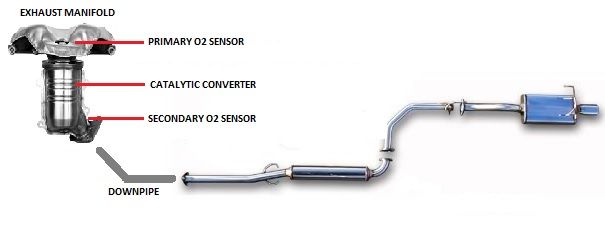
The headers that are made for 6th generation Civics are only made for EX models. The EX is considered to have a "normal" manifold as the catalytic converter is located under the body of the car, not inside the bay near the block. You'll notice with your LX/DX/CX/HX model Civic, the catalytic converter is located visibly from the bay, just after the start of your manifold.
EX Exhaust Layout:
Step 1: Install the NEW EX header.
Step 2: Install your NEW catalytic converter directly to the end of your newly installed header. You may be able to reuse your spring loaded bolts from your previous install. If not, stop by either (a) your local hardware store and pick-up some new 3" long 14mm grade 8 bolts with 1.5" washers and matching nuts. Be sure to reapply the spring from your previous setup. You can bolt it straight on without if you like but the springs are there to ease the tension from your header as your car moves/vibrates. (b) Stop by or order replacement spring-loaded bolts from a Honda retailer. (c) Hit-up your local junk-yard or pick-n-pull.
Step 3: Install your O2 sensor wire extension harness. The new primary is located in about the same area as your previous setup but your new secondary will be further below your car onto the BACK of your new catalytic converter.
Step 4: Install your NEW EX exhaust system onto the back of your newly installed catalytic converter.
Step 5: Enjoy!
Additional Information
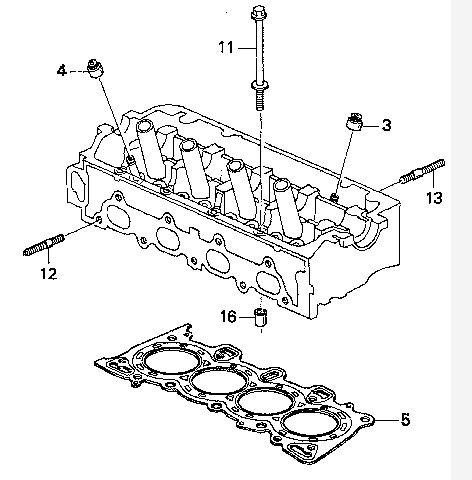
- For the bolts to connect your exhaust manifold to your engine, it is recommended that you contact a Honda dealer and have them ordered. Order however many you need (preferably a new full set) of part #90026-PT0-000. That's item #12 in below diagram from Honda. Be advised, Honda will charge you about $5.50 per bolt and $0.60 per nut.
- An alternative to purchasing from a Honda dealer is to go on eBay. Be aware though of the quality of bolt you are purchasing and make sure it is a reputable seller. Good bolts for a D16Y5 or D16Y7 are the Dorman 03415B Manifold Bolt Kit.
- ALWAYS remember to thoroughly spray your bolts with a penetrating liquid DAYS IN ADVANCE. WD-40, PB Blaster, Gunk Liquid Wrench Penetrate, etc. Let it soak in because believe me, 13+ year-old bolts DO snap their heads. Especial engine related bolts that have dealt with constant heating & cooling over the years (which is why it is recommended that you replace all hardware when doing this upgrade). Spray some on generously then let it soak for a day. Following day, do the same thing. Some people have done this process over a weeks span, others just a day in advance. Either way, it is recommended that you do this AT LEAST a day in advance because %50 of the people I've spoken too have told me their bolts broke when removing them without penetrating liquid.