
Headlight Armor - DIY Install - Headlight Protection Kit - Honda Civic Coupe
Supplies needed.
Headlight protection film kit - Smoke shown but they are also available in clear, HID Blue, and GT Yellow
Application squeegee (included in kit)
You will need to have a
Clean trigger spray bottle with warm water (plant mister works great)
Lint free detail cloths
Razor knife (small snap blades are good) for any final trimming as needed
Positive can do attitude (option but is helpful)
Hair Dryer (optional if warm out, necessary if it is cool)
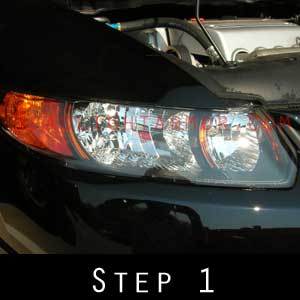
Step 1: Clean the lenses. Clean your hands. Make sure there are no residues from the cleaning process remaining on the lenses or your hands.
Without removing the lens cover from the backing paper hold it up to the lens and make sure you have the correct one / orientation (i.e. Slightly ovoid lenses).

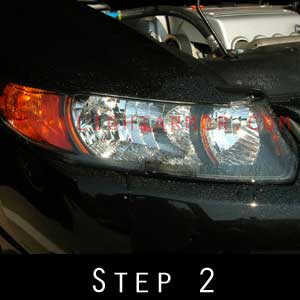
Step 2: If it is cool - below 65 degrees F gently warming the material with a hair dryer will help things along.
Carefully remove the cover from the backing paper - handling the adhesive as little as possible. Mist down the adhesive side.
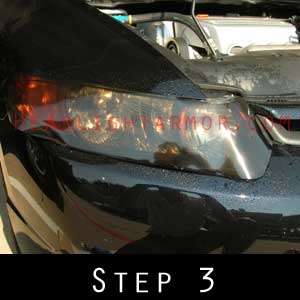
Step 3: Gently place on the lens and generally align.
Handling the edges align the front corner of the piece - (right side of the photo) then generally align the remaining edges. The piece will be 'floating' on the beads of water on the lens. Be gentle the adhesive is pressure sensitive.
Generally align the bottom horizontal section to the 'corner'.
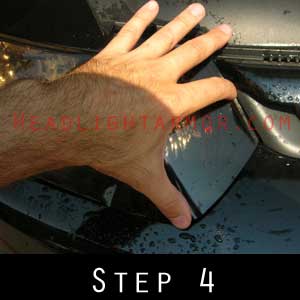
Step 4: Generally align the inside diagonal section - in steps 3-4 you want to make sure that the piece is centered top to bottom.
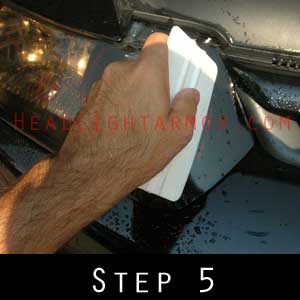
Step 5: Gently squeegee as shown - from the center toward the inside corner next to the grill. Be gently at first as to not draw the piece out of alignment.
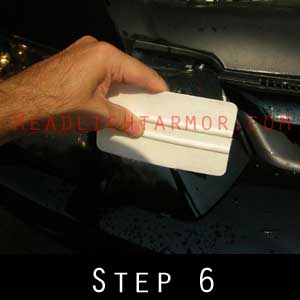
Step 6: Verify alignment and then squeegee down the corner as shown.
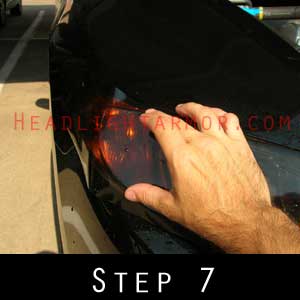
Step 7: With the inner corner aligned and squeegeed in place align the contoured relief cut to the edge of the protrusion as shown.
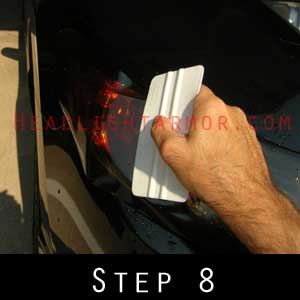
Step 8: Mist down the outside surface and firmly squeegee the front face of the step as shown
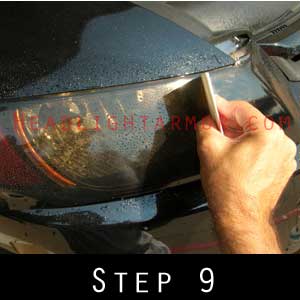
Step 9: Next squeegee from the front corner where you started across to the step that you just tacked, 'dragging' the squeegee firmly as shown. When you get to the step that you had just squeegeed turn down as to not try and push the water into an area that is set.
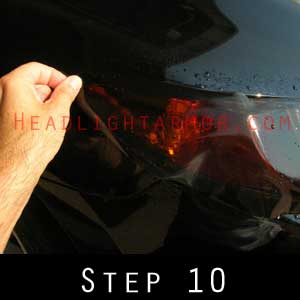
Step 10: Align the back corner of the kit. Depending on your alignment thus far the kit may want to naturally overhang. Don't worry, you can trim it off later. If it seems a bit short you can gently stretch it into place.
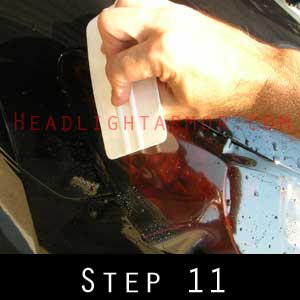
Step 11: Squeegee the back corner of the kit into place.
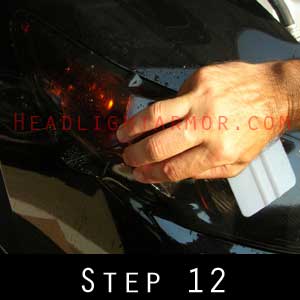
Step 12: Align the back side of the relief cut. Don't worry about 100% mating the vertical edge, a slight gap is normal. Just make sure the material is not overlapping anywhere - This can happen at the top and bottom. Just put it into alignment and squeegee.
Step 13: This kit was installed with ambient air temps ~90 degrees F. If it is cool out the use of a hair dryer on low will be necessary to complete this step.
Do not overheat the film, you just want to warm to about 90 degrees F.
This is the HARDEST part of the install. Use both hands and bend the squeegee to match the contour of the light. With VERY firm pressure slowly press the material down the back side as shown. The first part is to only work on the top/horizontal part, not the vertical part.
Hold in place firmly until set - can take a minute or so.
Step 13: Part 2 Once you have the top part done and the material FIRMLY set into the sharp valley at the bottom of the light continue slowly and FIRMLY pressing the material down to the edge of the light. If some material winds up hanging off carefully trim off after the edge is set.
If you have any other areas that are misaligned or overhanging you can either wrap the edge if it a flat surface or simply trim off the excess.
Go over the edges with a suede detail cloth / paper towel wrapped squeegee to make sure the edge is fully set. Gentle heat from a hair dryer on low can help things along if it is cool out.
With our protective headlight covers you will be able to change to look of your vehicle while protecting your headlights from being sand-blasted to death. They are available in Clear, HID Blue, GT Yellow and Smoked.
You can remove these at some point in the future if you are so inclined - though they can only be used once.
Supplies needed.
Headlight protection film kit - Smoke shown but they are also available in clear, HID Blue, and GT Yellow
Application squeegee (included in kit)
You will need to have a
Clean trigger spray bottle with warm water (plant mister works great)
Lint free detail cloths
Razor knife (small snap blades are good) for any final trimming as needed
Positive can do attitude (option but is helpful)
Hair Dryer (optional if warm out, necessary if it is cool)
Step 1: Clean the lenses. Clean your hands. Make sure there are no residues from the cleaning process remaining on the lenses or your hands.
Without removing the lens cover from the backing paper hold it up to the lens and make sure you have the correct one / orientation (i.e. Slightly ovoid lenses).
Step 2: If it is cool - below 65 degrees F gently warming the material with a hair dryer will help things along.
Carefully remove the cover from the backing paper - handling the adhesive as little as possible. Mist down the adhesive side.
Step 3: Gently place on the lens and generally align.
Handling the edges align the front corner of the piece - (right side of the photo) then generally align the remaining edges. The piece will be 'floating' on the beads of water on the lens. Be gentle the adhesive is pressure sensitive.
Generally align the bottom horizontal section to the 'corner'.
Step 4: Generally align the inside diagonal section - in steps 3-4 you want to make sure that the piece is centered top to bottom.
Step 5: Gently squeegee as shown - from the center toward the inside corner next to the grill. Be gently at first as to not draw the piece out of alignment.
Step 6: Verify alignment and then squeegee down the corner as shown.
Step 7: With the inner corner aligned and squeegeed in place align the contoured relief cut to the edge of the protrusion as shown.
Step 8: Mist down the outside surface and firmly squeegee the front face of the step as shown
Step 9: Next squeegee from the front corner where you started across to the step that you just tacked, 'dragging' the squeegee firmly as shown. When you get to the step that you had just squeegeed turn down as to not try and push the water into an area that is set.
Step 10: Align the back corner of the kit. Depending on your alignment thus far the kit may want to naturally overhang. Don't worry, you can trim it off later. If it seems a bit short you can gently stretch it into place.
Step 11: Squeegee the back corner of the kit into place.
Step 12: Align the back side of the relief cut. Don't worry about 100% mating the vertical edge, a slight gap is normal. Just make sure the material is not overlapping anywhere - This can happen at the top and bottom. Just put it into alignment and squeegee.
Step 13: This kit was installed with ambient air temps ~90 degrees F. If it is cool out the use of a hair dryer on low will be necessary to complete this step.
Do not overheat the film, you just want to warm to about 90 degrees F.
This is the HARDEST part of the install. Use both hands and bend the squeegee to match the contour of the light. With VERY firm pressure slowly press the material down the back side as shown. The first part is to only work on the top/horizontal part, not the vertical part.
Hold in place firmly until set - can take a minute or so.

Step 13: Part 2 Once you have the top part done and the material FIRMLY set into the sharp valley at the bottom of the light continue slowly and FIRMLY pressing the material down to the edge of the light. If some material winds up hanging off carefully trim off after the edge is set.
If you have any other areas that are misaligned or overhanging you can either wrap the edge if it a flat surface or simply trim off the excess.
Go over the edges with a suede detail cloth / paper towel wrapped squeegee to make sure the edge is fully set. Gentle heat from a hair dryer on low can help things along if it is cool out.
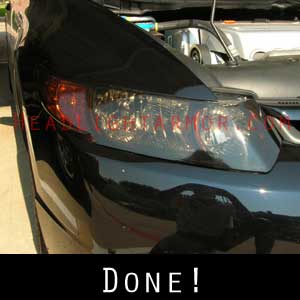
With our protective headlight covers you will be able to change to look of your vehicle while protecting your headlights from being sand-blasted to death. They are available in Clear, HID Blue, GT Yellow and Smoked.
You can remove these at some point in the future if you are so inclined - though they can only be used once.
