
DIY: Skunk2 Intake Manifold Install – 94-01 Integra GSR
Applicable Years: 92-00 Honda Civic, 90-01 Acura Integra
Difficulty: 2 out of 5
Estimated Time: 3hrs
Product Features:
• Single staged intake manifold design
• 64mm plenum opening
• Factory throttle body may be reused
• Utilizes factory sensors
• Larger plenum and runners to optimize horsepower
• Smoother finish to optimize air flow
• Modified #4 intake entry
• Significant mid to high-range power gains
Purchase a Skunk2 Intake Manifold
http://www.tunersports.com/products/skunk2/skunk2-pro-series-intake-manifold_114.html
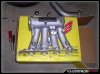
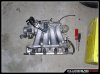
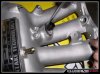
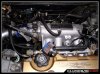
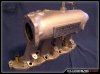
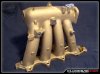
Product Photos:

The Install Process:
Disconnect your negative battery terminal and drain coolant.
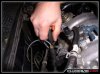
Relieve fuel pressure by loosening the banjo bolt on the top of the fuel filter and remove the fuel line at the rail. Then disconnect the lines from the fuel pressure regulator and remove the fuel injector clips.
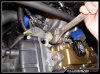
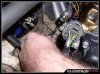
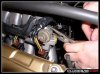
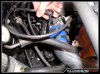
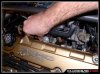
Remove your intake from the throttle body. Then disconnect all hoses and sensors leading to the intake manifold and throttle body including your throttle cable bracket.
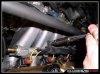
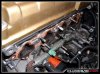
Unbolt the manifold from the cylinder head. Remove the intake manifold, throttle body, and fuel rail as one unit. Inspect intake manifold gasket. Replace as needed. Make sure to note all disconnected hoses and sensors.
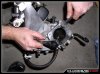
Unbolt the throttle body from the intake manifold; inspect the throttle body gasket for damage and replace as needed. Unscrew the throttle body studs from the flange and reinstall in the new manifold (make sure that when lining up the throttle body gasket, the U-shaped portion faces top-left-corner of flange).
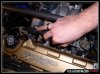
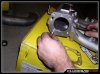
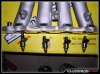
Remove fuel rail assembly and install in the new manifold, including the fuel rail studs. Inspect o-rings and replace as needed.
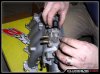
From the factory intake manifold, unbolt and remove the idle air control valve and intake air temperature valve to install into the new manifold.
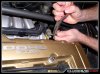
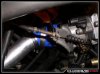
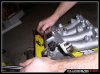
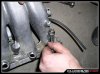
Bolt on manifold-throttle body-fuel rail assembly back onto cylinder head, making sure that the manifold gasket is positioned properly and securely. Connect the evaporative emissions purge control solenoid valve. Due the new intake manifold design, there is no mounting location for the EVAP purge control solenoid valve. It is recommended the unit be zip-tied to a secure location. For 94-95 vehicles, one hose end will plug into the charcoal canister and the other hose end will plug into the small vacuum fitting located on the rear of the new intake manifold. For 96-01 vehicles, please refer to the note below.
The FPR host will be re-plugged into the small vacuum fitting located on the front of the new intake manifold.
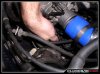
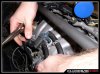
Bolt on and connect the fuel injector harness holder and hoses. Connect TPS, map sensor, and fuel line. Tighten the banjo bolt on the top of the fuel filter.
Connect batter and replace coolant.
Any unused fittings can be plugged by using vacuum caps
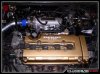
I ended up eventually getting a Type R throttle body bracket, throttle cable, and LS throttle pulley to make the install a bit cleaner looking.
Note:
1996-2001 vehicles are OBD II and equipped with a different-type EVAP purge control solenoid compared to that of pre-1996 vehicles.
1996-2001 EVAP: The EVAP purge control solenoid valve will not have a mounting point due to the new design of the manifold. It is recommended thtat the unit be zip-tied to a secure location. In order to connect the EVAP purge control solenoid valve, a T-fitting must be used to re-fit the PCV hose and EVAP hose onto the larger vacuum fitting located on the manifold plenum body.
1996-2001 PCV: The upper and lower Type-R PCV (positive crankcase ventilation) hoses will be used to reconnect the breather chamber to the PCV valve, to the T-fitting opposite of the EVAP hose.
1996-2001 Linkage: As an option, the Type-R throttle body cable and mounting bracket can be used.
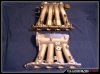
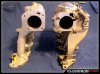
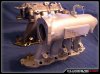
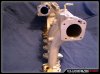
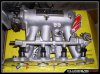
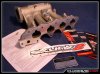
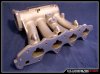
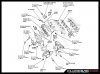
Anatomy of an Intake Manifold – Skunk2 vs. Clone
Click here to view the PDF file.
Skunk2 vs. Stock Intake Manifold Photos:
Applicable Years: 92-00 Honda Civic, 90-01 Acura Integra
Difficulty: 2 out of 5
Estimated Time: 3hrs
Product Features:
• Single staged intake manifold design
• 64mm plenum opening
• Factory throttle body may be reused
• Utilizes factory sensors
• Larger plenum and runners to optimize horsepower
• Smoother finish to optimize air flow
• Modified #4 intake entry
• Significant mid to high-range power gains
Purchase a Skunk2 Intake Manifold
http://www.tunersports.com/products/skunk2/skunk2-pro-series-intake-manifold_114.html
Product Photos:
The Install Process:
Disconnect your negative battery terminal and drain coolant.
Relieve fuel pressure by loosening the banjo bolt on the top of the fuel filter and remove the fuel line at the rail. Then disconnect the lines from the fuel pressure regulator and remove the fuel injector clips.
Remove your intake from the throttle body. Then disconnect all hoses and sensors leading to the intake manifold and throttle body including your throttle cable bracket.
Unbolt the manifold from the cylinder head. Remove the intake manifold, throttle body, and fuel rail as one unit. Inspect intake manifold gasket. Replace as needed. Make sure to note all disconnected hoses and sensors.
Unbolt the throttle body from the intake manifold; inspect the throttle body gasket for damage and replace as needed. Unscrew the throttle body studs from the flange and reinstall in the new manifold (make sure that when lining up the throttle body gasket, the U-shaped portion faces top-left-corner of flange).
Remove fuel rail assembly and install in the new manifold, including the fuel rail studs. Inspect o-rings and replace as needed.
From the factory intake manifold, unbolt and remove the idle air control valve and intake air temperature valve to install into the new manifold.
Bolt on manifold-throttle body-fuel rail assembly back onto cylinder head, making sure that the manifold gasket is positioned properly and securely. Connect the evaporative emissions purge control solenoid valve. Due the new intake manifold design, there is no mounting location for the EVAP purge control solenoid valve. It is recommended the unit be zip-tied to a secure location. For 94-95 vehicles, one hose end will plug into the charcoal canister and the other hose end will plug into the small vacuum fitting located on the rear of the new intake manifold. For 96-01 vehicles, please refer to the note below.
The FPR host will be re-plugged into the small vacuum fitting located on the front of the new intake manifold.
Bolt on and connect the fuel injector harness holder and hoses. Connect TPS, map sensor, and fuel line. Tighten the banjo bolt on the top of the fuel filter.
Connect batter and replace coolant.
Any unused fittings can be plugged by using vacuum caps
I ended up eventually getting a Type R throttle body bracket, throttle cable, and LS throttle pulley to make the install a bit cleaner looking.
Note:
1996-2001 vehicles are OBD II and equipped with a different-type EVAP purge control solenoid compared to that of pre-1996 vehicles.
1996-2001 EVAP: The EVAP purge control solenoid valve will not have a mounting point due to the new design of the manifold. It is recommended thtat the unit be zip-tied to a secure location. In order to connect the EVAP purge control solenoid valve, a T-fitting must be used to re-fit the PCV hose and EVAP hose onto the larger vacuum fitting located on the manifold plenum body.
1996-2001 PCV: The upper and lower Type-R PCV (positive crankcase ventilation) hoses will be used to reconnect the breather chamber to the PCV valve, to the T-fitting opposite of the EVAP hose.
1996-2001 Linkage: As an option, the Type-R throttle body cable and mounting bracket can be used.
Anatomy of an Intake Manifold – Skunk2 vs. Clone
Click here to view the PDF file.
Skunk2 vs. Stock Intake Manifold Photos:
Attachments
-
 59.6 KB Views: 61,320
 -
 68.7 KB Views: 60,476
 -
 65.8 KB Views: 59,559
 -
 54.2 KB Views: 59,331
 -
 59.6 KB Views: 59,280
 -
 55.2 KB Views: 59,198
 -
 77.1 KB Views: 64,317
 -
 82.1 KB Views: 63,800
 -
 74.2 KB Views: 63,505
 -
 70.1 KB Views: 63,444
 -
 77.5 KB Views: 63,367
 -
 67.6 KB Views: 584
 -
 63.9 KB Views: 62,862
 -
 71.3 KB Views: 62,647
 -
 72.5 KB Views: 62,454
 -
 67.9 KB Views: 62,234
 -
 55.6 KB Views: 62,067
 -
 68.9 KB Views: 530
 -
 74.5 KB Views: 513
 -
 78.4 KB Views: 62,813
 -
 72.7 KB Views: 62,005
 -
 87 KB Views: 61,912
 -
 70.8 KB Views: 61,121
 -
 71 KB Views: 61,708
 -
 69.7 KB Views: 61,327
 -
 68.7 KB Views: 61,053
 -
 64.1 KB Views: 61,029
 -
 66.1 KB Views: 65,108
 -
 75.5 KB Views: 60,713
 -
 74.9 KB Views: 60,876
 -
 75.1 KB Views: 60,771
 -
 83 KB Views: 61,578
 -
 83 KB Views: 61,660
 -
 82.4 KB Views: 1,386
 -
 76.6 KB Views: 162,472
 -
 57.3 KB Views: 64,900
 -
 53.4 KB Views: 64,721
 -
 54.5 KB Views: 64,182
 -
 52.1 KB Views: 63,950
 -
 37.8 KB Views: 63,614
 -
 58.1 KB Views: 60,677
Last edited by a moderator:
