
DIY: Ingalls Stiffy™ Adjustable Engine Torque Damper for 2002-2005 Honda Civic Si (93022)
Applicable Years: 02-05 Civic
Difficulty: 1 out of 5
Estimated Time: 30mins
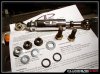
Kit Contents:

Tools Needed:
• Ingalls Stiffy™ part # 93022
• 14, 15, 17 mm sockets and open-face wrenches
• Adjustable wrench
Installation:
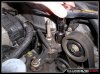
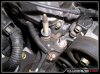
Under the hood remove the two inside 14mm nuts that secure the passenger shock.
Install the Chassis Mounting Bracket and tighten down the nuts.
Remove the gold colored nut closest to the front bumper using a 17 mm socket.
Place the 12mm washer on top of the nut on the stud closest to the firewall.
Install the Engine Mounting Bracket and tighten down using the stock nut (17mm socket) for the front stud and the supplied nut using a 19mm socket.
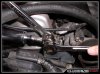
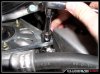
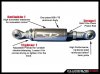
Install the Stiffy™ onto the Chassis Mounting Bracket using the supplied hardware using a 15mm socket and 17mm open-face wrench.
The supplied o-ring is placed between the Stiffy and washer, this helps dampen road noise "feel" that can be transferred through the assembly.
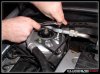
Mount the Stiffy™ to the Engine Mounting Bracket using a 15mm socket and 17mm open-face wrench. Be sure to install the washer and o-ring in the same order as above.
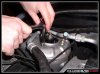
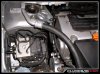
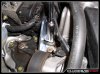
That's it, your done. This is how it should look when complete.
Product Review:
After installing the Ingalls Stiffy™ Engine Torque Damper you can immediately notice the "stiffer" feel during start up since the motor doesn't "rock" as much. On the road you'll notice it greatly reduces wheel-hop during launches and torque-steer when running out your gears. Shifts are more precise while it does add a bit more "engine-noise" inside the cabin. The adjustable feature allows the assembly to be tuned and pre-loaded for racing and street applications.
Big thanks to Rob over at Ingalls www.ingallseng.com
Applicable Years: 02-05 Civic
Difficulty: 1 out of 5
Estimated Time: 30mins
Kit Contents:
Tools Needed:
• Ingalls Stiffy™ part # 93022
• 14, 15, 17 mm sockets and open-face wrenches
• Adjustable wrench
Installation:
Under the hood remove the two inside 14mm nuts that secure the passenger shock.
Install the Chassis Mounting Bracket and tighten down the nuts.
Remove the gold colored nut closest to the front bumper using a 17 mm socket.
Place the 12mm washer on top of the nut on the stud closest to the firewall.
Install the Engine Mounting Bracket and tighten down using the stock nut (17mm socket) for the front stud and the supplied nut using a 19mm socket.
Install the Stiffy™ onto the Chassis Mounting Bracket using the supplied hardware using a 15mm socket and 17mm open-face wrench.
The supplied o-ring is placed between the Stiffy and washer, this helps dampen road noise "feel" that can be transferred through the assembly.
Mount the Stiffy™ to the Engine Mounting Bracket using a 15mm socket and 17mm open-face wrench. Be sure to install the washer and o-ring in the same order as above.
That's it, your done. This is how it should look when complete.
Product Review:
After installing the Ingalls Stiffy™ Engine Torque Damper you can immediately notice the "stiffer" feel during start up since the motor doesn't "rock" as much. On the road you'll notice it greatly reduces wheel-hop during launches and torque-steer when running out your gears. Shifts are more precise while it does add a bit more "engine-noise" inside the cabin. The adjustable feature allows the assembly to be tuned and pre-loaded for racing and street applications.
Big thanks to Rob over at Ingalls www.ingallseng.com
Attachments
-
 81.7 KB Views: 11,415
 -
 80.6 KB Views: 9,951
 -
 58.8 KB Views: 9,756
 -
 68.8 KB Views: 9,609
 -
 58.9 KB Views: 9,970
 -
 79.1 KB Views: 9,894
 -
 64.1 KB Views: 9,659
 -
 76.2 KB Views: 11,019
 -
 63.9 KB Views: 9,911
 -
 77.8 KB Views: 9,931
 -
 48.7 KB Views: 9,774
Last edited by a moderator: