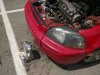
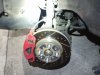
On another note, I had a brake line rub the wheel exactly as yours was. Except I found out when the brake pressure when to 0. I had to apply the parking brake very gently when I was cruising at 65mph. It was a true ass pucker moment. I luckily slowed down enough safely to drift into a Walmart parking lot.
Inspected the issue and saw the trauma. I was also 180 or so miles from home. I ended up clamping down the hose with vice grips and bled the brakes in the parking lot. Drove the car home carefully with only the left front and rear brakes.
Recently (likely beginning after the valve adjustment job) the engine began to hiccup when coming out of a stop. I'd be just getting into second gear and the engine will die for about a second, and then catch again and keep going. I should have recognized the symptoms, but I didn't and assumed it was time to replace the spark plug wires and distributor cap and rotor instead. The distributor parts have a month long backlog to ship for some reason, so I still haven't done that.
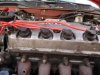
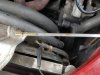
And there was another robotics tournament this weekend, about 4 hours away. Made it there without incident, and then while getting things ready to leave from the event and head home I finally noticed the cause of hiccuping: two of the spark plug wells had oil in them, and one of the wires had been blown unseated.
There wasn't much I could do, but I did find a plastic knife on the ground, and used it to get the oil soaked up and cut a channel in the spark plug wire's rubber seal so it wouldn't pop unseated as easily.
I got home OK and took a closer look at what was going on. This is the second time I've been burned by valve cover seals, but this time they were the higher-quality kind and hadn't fallen away from the cover. So I'm not sure how the boot was blown out of the well, unless it was blowby leaking past... My hypothesis right now is that when I put the valve cover back on after doing the valve adjustment, the seals for the spark plug wells were just sitting on top of the well cylinders and not tightly sealing around the tube, and thus were letting oil leak into the wells.
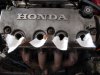
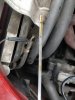
I really didn't want to have to go back through RTV'ing the rim of the valve cover again, especially since it hasn't started leaking there yet. So I took a thin feeler gauge and used it to gently push the seals down and around the spark plug tubes, and then pushed pieces of paper towel into the cavity between the seal and the tube to soak up the oil that was trapped there. I'll have to check on the engine after driving some more to see if oil is still intruding or not.
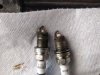
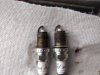
Then I used a thin screwdriver and more papertowel to get the oil out of the wells. And just for good measure I pulled the spark plugs and then re-torqued them with a dab of anti-seize.
And since the rubber had swelled with the oil (and I'd cut one with a plastic knife), I swapped the cheapo red spark plug wires for some Denso ones that had finally arrived in the mail.
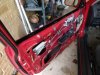
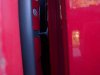
Over the winter I began to notice the driver side window struggling to lower and raise. With everything else going on, I kept putting off finding the time to go out and lubricate the window tracks. Then, one day I was raising it and the window twisted clockwise toward the front of the car and then pulled out of the track and was stuck! I had to get on the outside of the car and press on the window while pushing the roll-down button to ease it back into the rubber window track.
The two tracks inside the door don't appear to have been damaged, but after that incident the window was "floppy" when partially rolled down, and it would easily twist and get stuck again. I figured some part of the linkage assembly was damaged, and ordered a Dorman replacement.
Luckily the window itself wasn't damaged. I pulled it, cleaned it, and set it aside.
I didn't remember to get the pictures I wanted when swapping the two window units, but the old one wasn't obviously broken. The plastic sliders were maybe a little loose inside the metal tracks, but that was it. I'm wondering now if perhaps the bolts between the window and the track came loose to make the window floppy, or something like that.
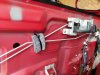
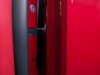
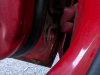
While the door was taken apart, I finally got around to fixing a rattle that's been driving me bonkers for several months now. The linkage to the door-lock tab by the interior handle would vibrate at the RPM I typically cruise at. There's some OEM padding to keep that from happening, but it had started to pull apart and wasn't pressing on the linkages anymore, so I drilled two holes and added a ziptie. Rattle problem solved!
The new Dorman linkage assembly didn't come with a helper spring like the one I removed had. And it is noticeably slower to raise the window than the old unit was. Shucks.
For now the interior trim is staying off, while I find time to go through and epoxy the various cracks in the plastic. I'm not sure if I should start planning to laser cut some sort of replacement or just double down on keeping the old stock trim.
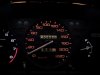
Got a CEL while driving back from lunch yesterday. Blink code 07, and when I found the scanner CEL code P0122 -> Throttle Position Sensor (Low).
I un- and then re- plugged the connector in the engine bay, and then pressed the accelerator pedal with my foot and could see the live value go from 9% to 85% WOT in the scanner tool, so I cleared the code. So far so good.
Over the winter I began to notice the driver side window struggling to lower and raise. With everything else going on, I kept putting off finding the time to go out and lubricate the window tracks. Then, one day I was raising it and the window twisted clockwise toward the front of the car and then pulled out of the track and was stuck! I had to get on the outside of the car and press on the window while pushing the roll-down button to ease it back into the rubber window track.
The two tracks inside the door don't appear to have been damaged, but after that incident the window was "floppy" when partially rolled down, and it would easily twist and get stuck again. I figured some part of the linkage assembly was damaged, and ordered a Dorman replacement.
Luckily the window itself wasn't damaged. I pulled it, cleaned it, and set it aside.
I didn't remember to get the pictures I wanted when swapping the two window units, but the old one wasn't obviously broken. The plastic sliders were maybe a little loose inside the metal tracks, but that was it. I'm wondering now if perhaps the bolts between the window and the track came loose to make the window floppy, or something like that.
While the door was taken apart, I finally got around to fixing a rattle that's been driving me bonkers for several months now. The linkage to the door-lock tab by the interior handle would vibrate at the RPM I typically cruise at. There's some OEM padding to keep that from happening, but it had started to pull apart and wasn't pressing on the linkages anymore, so I drilled two holes and added a ziptie. Rattle problem solved!
The new Dorman linkage assembly didn't come with a helper spring like the one I removed had. And it is noticeably slower to raise the window than the old unit was. Shucks.
For now the interior trim is staying off, while I find time to go through and epoxy the various cracks in the plastic. I'm not sure if I should start planning to laser cut some sort of replacement or just double down on keeping the old stock trim.
So coming back to this. Love that you zip tied up the rods. If those things are allowed to flex it causes all kinds of issues with open, closing and locking the doors.
Im working on designing a snap-in retaining system to keep these from flexing.
I guess I'm making up for it today with some extra complexity
I have a road trip this week that's 450miles each way, so I figured I'd change the oil in the ol' Mothership yesterday. But I'm feeling a little frugal. I didn't replace the oil filter and used some cardboard-carton-oil that was half full. Drained the pan, put the bolt back, and then poured the rest of the carton in without measuring, expecting to have to top it up. But it actually filled up past the top mark on the dipstick instead I guess I'm just used to the amount needed for the filter too.
I didn't think much of it and hopped in the car this morning to leave. And sitting at a red light I got curious and googled "civic overfill oil". Whoops. I read how the overfull level can collide with the crankshaft and whip air bubbles into the oil pump. That doesn't sound ideal.
I started noticing the engine starting to struggle, which could have been entirely in my head, or entirely real. So about 200 miles into the trip, I stopped and tried checking the oil again, but had a lot of trouble reading the very clean, very thin oil on the dipstick. I convinced myself that the level in the pan was at least a half inch above the full mark.. So, maybe a quart over full? Its difficult to judge the amount based on just the dipstick.
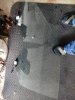
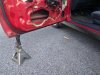
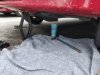
I found a pet supply store and bought some tubing to try siphoning the oil out of the dipstick tunnel:
I primed the tube with oil and put the low end into the jug of oil I keep in the trunk, but it just sat there and wouldn't flow. Considering how low the oil pan sits on this car, I figured that there just wasn't enough of a height delta. So I broke out an empty bottle and put the low end in that. Drip... Drip... Between how tiny the tube is, and how little height advantage there was, the oil just wasn't really moving.
I fished the scissor jack out of the trunk, and jacked up the front of the car to get the oil pan higher up. Now it was Drip. Drip. About once a second. Still way too slow. For a little while I toyed with trying to increase the speed, by using the tire inflator pump to blow air into the valve cover (not enough flow to actually build any pressure), then to actually running the engine with the tube in, to try and get the positive crankcase pressure to push the oil out.
Then I noticed something: as soon as the engine started, the oil in the tube vanished. I tried re-fishing it into the oil pan and then straw-sucking up more oil, but nothing came up. Eventually I got an oil column to reach above the dipstick pipe before it disintegrated. In that moment I saw oil with tons of little bubbles in it, and the bubbles were causing the oil to collapse and wick back down the tube's walls. Once the engine was off and had sat for a few minutes, I could draw out the oil no problem-o. Part of me wants to repeat this experiment now that the level is back to just below the top dipstick mark, so that I can see whether or not those bubbles were really caused by overfilling
Finally - two hours into this - I gave up and crawled under the car with a soda cup and a socket set that I somehow found in the car. After the drain bolt was free I carefully, gently unscrewed it by hand, and then held it against the bung once it was free, letting just a pencil width column of oil pour out and into the cup. I expected to mess this part up and wind up covered in oil and leaking it all over someone's parking lot, but instead the cup got filled without spilling a drop!
All in all I think I recovered a little over a quart from the pan, and now the oil level sits just below the top fill mark. Maybe I'll go re-do that bubble experiment soon, but for now the car's still running and I've got my fingers crossed!
To gauge the amount over, the distance between the two holes is exactly 1 quart. So that can give you an idea of how much overfilled it was. If enough then oil cavitation may be possible but it really has to get it stirred up being overfilled usually by 2+ quarts.
Tale tale sign of cavitation in my experience and from others online over the last decade and a half, check the journal bearing of cylinder 3. Tends to show wear first from oil cavitation.
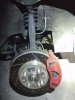
Thats funny. The rear suspension is screaming for life. I have the same wash tank but I do not have a sandblasting box though. Brakes look good. My property project is coming along so hoping to continue working on the Civic in the next couple of months hopefully.
My CRV chassis has 270k on it. I still have the original engine, blew the automatic trans some years ago. It was quicker to pull the engine and trans at salvage, swap the entire unit then to separate and reinstall.
The OE B20B will get higher compression internals and a Jackson Racing Supercharger. Im keeping the automatic and will be installing high tq clutch packs. I think the torque converter will be able to handle the additional power. Will find out for sure.
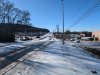
It's cold out here! Last Sunday we got a whole day of rain, and then sleet, and overnight it froze into a solid layer. The salt they use on roads 'round here isn't made for that, and the whole town shut down for the week as we waited for the ice to melt. I took a walk on Tuesday and had trouble just navigating my neighborhood without slipping and falling. Here's a selfie I snapped:
It's been a little difficult dealing with being cooped up inside while thinking about how a friend and I used to go out and help pull cars out of ditches during weather like this. I guess I need to go find another kindred spirit at some point.
On Wednesday I saw the smoke signals.. There was trouble up on the mountain! I could only sit and watch as email after email came in; a deluge of bad news. In the observatory I volunteer at a pipe had burst, and was flooding the building. A few people had made it there on foot, and then spent hours struggling to contain the damage and get the water main turned off. Part of the affected area was our library, where archived documents dating back to the Apollo Moon program are stored.
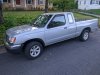
I wanted to help. I looked at my dehumidifier. It stared back at me. And I knew what must be done. The beat up truck I bought last year has a 2-tonn clutch, and ratty tires. It wouldn't make the journey up the mountain and to the back of the state park where the observatory lies. Only the Civic could get that dehumidifier to the books that need it. And so today, when the roads down in town were starting to clear up, I loaded the bulky drier into The Mothership and set out on an adventure.
It was dark by the time I reached the mountain. The city crews had only this morning cleared the final roads up to the state park, but as I approached it became clearer and clearer that this was going to be a challenge. The salted roads gave way to slush, which gave way to crushed ice. And finally, at the entrance to the park the ice was solid. The elevation had kept it below freezing up here, and the layer of ice was a skating rink. Gingerly, I coaxed the car as far as it would go, and then parked and unloaded the drying unit.
I was still a little less than a mile from the observatory, and the ice made it difficult to stand up. So I crouched behind the dehumidifier and used it to help stabilize my torso. Then I pushed a foot out behind me and slide the unit forward. Slowly, keeping low and sliding my feet to get all the traction I could, I built up speed to a slow walking pace. It was exhausting, much more so than I expected. I kept stopping to jam both hands into my coat and warm up, but then I would have to re-build up to speed on the ice. Eventually I reached an area where some tire and foot tracks that had re-frozen gave more purchase. I stopped, and got ready to carry the dehumidifier through the last bit of woods down to the observatory.
The library was already drying out pretty well on its own, which was excellent news. I found another room and got the dehumidifier set up. I was so focused on getting there and plugging in the unit, it was a surprise to not feel relieved when the dehumidifier was finally hooked up and running. Instead, a sense of dread overcame me. Now was the hard part. I had to make it back to the car and drive out of here.
Where there wasn't tracks to walk on, I half-crawled back to the car. Once inside I put the seat fully upright and removed my scarf and hat to help get the best possible clearance to see and hear what was happening with the ice outside. With the clutch fluttering, I began a fraught game of high-stakes curling: turn the wheel, spin the tires until the car began to react, and then as the nose swung around turn the wheels back the other way to correct it.
The edited-for-entertainment version of this story would have included this next part as a portion of escaping the frozen state park. But as it actually happened, I finally made it back to solid pavement and loudly exclaimed my desire to never drive on ice again, and the engine lurched. And then again. It would cut and then rev back within a single second, sending the car lurching across the road. The check engine light came on.
I drove my lurching car home in pensive silence, considering the extent to which I would be totally screwed if it had been lurching like this while I skated free of the ice. The CEL code? Any guesses? It's P0122, throttle position sensor. Same as last winter. I had totally forgotten.
I'm home now and recovering with some rye whiskey. But once the weather warms a little I plan to root out that throttle error and not allow it to lurk like this for another year.